article : Measurement with the Light Microscope

March 11, 2010


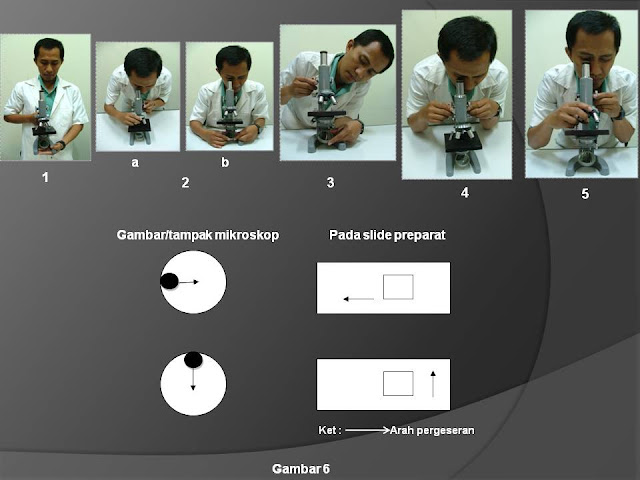
Your microscope may be equipped with a scale (called a reticule) that is built into one eyepiece. The reticule can be used to measure any planar dimension in a microscope field since the ocular can be turned in any direction and the object of interest can be repositioned with the stage manipulators. To measure the length of an object note the number of ocular divisions spanned by the object. Then multiply by the conversion factor for the magnification used. The conversion factor is different at each magnification. Therefore, when using a reticule for the first time, it is necessary to calibrate the scale by focusing on a second micrometer scale (a stage micrometer) placed directly on the stage.

Conversion factor

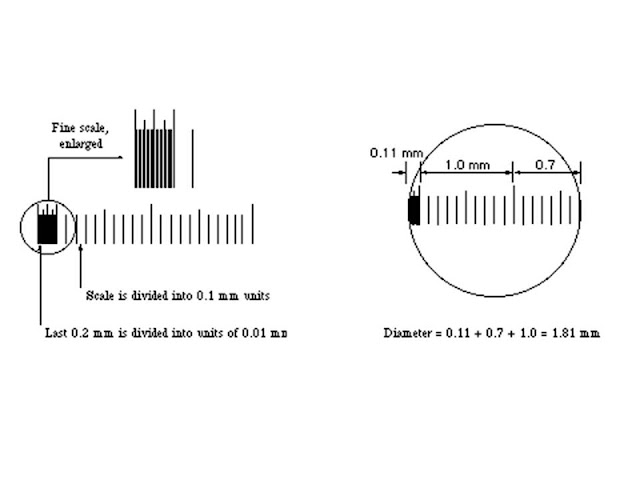
Identify the ocular micrometer. A typical scale consists of 50 - 100 divisions. You may have to adjust the focus of your eyepiece in order to make the scale as sharp as possible. If you do that, also adjust the other eyepiece to match the focus. Any ocular scale must be calibrated, using a device called a stage micrometer. A stage micrometer is simply a microscope slide with a scale etched on the surface. A typical micrometer scale is 2 mm long and at least part of it should be etched with divisions of 0.01 mm (10 µm).
Suppose that a stage micrometer scale has divisions that are equal to 0.1 mm, which is 100 micrometers (µm). Suppose that the scale is lined up with the ocular scale, and at 100x it is observed that each micrometer division covers the same distance as 10 ocular divisions. Then one ocular division (smallest increment on the scale) = 10 µm at 100 power. The conversion to other magnifications is accomplished by factoring in the difference in magnification. In the example, the calibration would be 25 µm at 40x, 2.5 µm at 400x, and 1 µm at 1000x.
Some stage micrometers are finely divided only at one end. These are particularly useful for determining the diameter of a microscope field. One of the larger divisions is positioned at one edge of the field of view, so that the fine part of the scale ovelaps the opposite side. The field diameter can then be determined to the maximum available precision.

Estimating and reporting dimensions

Be aware that even under the best of circumstances the limit of resolution of your microscope is 1 or 2 µm (or worse) at any dry magnification, and 0.5 µm or so using oil immersion. No directly measured linear dimension or value that is calculated from a linear dimension should be reported with implied accuracy that is better than that. That includes means, surface areas, volumes, and any other derived values. For example, suppose you measure the length of a flagellum on a Chlamydomonas cell at 400x, and determine that it covered 3 1/2 ocular divisions. The length is directly calculated as 3.5 divisions times 2.5 µm per division, which comes out to 8.75 µm. You know, however, that at 400x the absolute best you can do is to estimate to the nearest µm, so before reporting this measurement round it to 9 micrometers (not 9.0, which would imply an accuracy to the nearest 0.1 µm). For more information on reporting uncertain quantities see our Resources section (analytical resources).
The calculation of a volume is subject to error propagation, namely the magnification of an error when deriving a figure from one or more measured variables. For example, suppose you measure the length and diameter of an object to be 65 and 30 micrometers, respectively, assuming a cylindrical shape. The volume is given by the formula v = ¼r2l, where r = radius and l = length. The formula gives a volume of 45, 946 µm3. The volume isn't accurate to the nearest cubic micrometer, however.
Let's make the very optimistic assumption that the measurement of 65 micrometers is indeed accurate to the nearest 1 µm. Then the number 65 means "greater than 64.5 and less than 65.5." The number 30 really means "greater than or equal to 29.5 and less than or equal to 30.5." The smaller set of measurements yields a volume of 44,085 µm3, while the larger yields a volume of 47,855 µm3. False precision would be implied even if one reported a volume of 46,000 µm3, obtained by rounding the middle measurement. It would probably be better to report a range in this case, of 44,000 to 48,000 µm3. By the way, 46,000µm3 is 0.046 mm3, which probably represents a better choice of units in this case.

Making assumptions

In many areas of experimental science, including biosciences, the ability to estimate and make reasonable assumptions is a valuable skill. In order to make some quantitative estimates, particularly of volumes, you will have to make assumptions regarding the shape of some organisms. For example, if a specimen appears round, you would likely make your volume calculation based on the assumption that the specimen is a perfect sphere. For something like aParamecium you might assume a cylindrical shape in order to simplify your estimate, while remaining aware that you could be way off the mark.
A specimen such as Chaos (Pelomyxa) carolinensis represents a real challenge. Ameoboid organisms are irregularly shaped most of the time. Is it flat on the slide, or does it extend up toward the coverslip? Perhaps it is attached to both. What model do you use as a basis for volume estimation? Is it best to assume a particular shape and take measurements at different times? Is it best to estimate a maximum and minimum for each possible dimension and obtain a range of possible volumes? Remember, you are only asked to estimate. Sometimes the best estimates have a potential error of more than an order of magnitude.

source : http://www.ruf.rice.edu/.

Read more...

Service Guarantee

March 09, 2010


We give microscope service especially on mechanical repair. Mechanical functions repairing are give to troubled parts (like ocular tube loose, troubles in adjustments knobs, revolver loose, damaged stage, etc).we can reset all into normal condition EXCEPT damaged parts or broken parts for example, worn out adjustments knob gears, we can repair it and have to change with new parts.
We give lenses cleaning service. But if the lens scratched, it can’t be repaired and we have to change with new lens.
Guaranteed?
Repaired microscope can back into normal condition and normal function too. What we have to do after service can see here. We guarantee mechanical parts minimally for at least 6 months. Usually we have to recondition and repair microscope in every 2-3 years after previous service (ideally, we need to repair in every semester).
We not guarantee optical parts… because it depends on behavior of microscope user. It can be lasting longer if we understand and really do optical care or maintenance. If we hadn’t, the optical parts will damage quickly. You can see my previous article about using microscope here

Read more...

Microscope slide preparation technique


How to make microscope slide object preparation? Picture above is one of kind sample slide preparation made from complex process. There are many methods for preparation making. Plant tissue preparation is different with histology preparation in making method. On this post, I have concern more to histology and plant tissue preparation making.

Study about preparation making is known as micro technique (in this post, plant micro technique). This study is especially to learning about making long age slide preparation or fresh slide preparation. Paraffin method and wood slicing method are methods that will be learned in this post. In paraffin method, plant organ kept in paraffin and sliced into thin slices and colored before ready to observe in microscope.

Wood slicing method needs special treatment. Specific differences in every kinds of plant need us to knowing well about the life cycle of each plant. We need to know every reagent give effect to each kind of plants.

Making of plant slide preparation

Making of animal slide preparation

Read more...

Making of plant slide preparation

March 08, 2010


Sampling
This step is to decide what kind of plant and organ or tissue that we need. Click here to see the process
Fixation
Fixation is using FAA solution (formalin, alcohol, acetic acid glacialic) for at least 24 hours. Fixation purpose is to makes sample died and increase durability of sample without change the condition and appearance of the sample. But if we not do this process carefully, it can make sample damaged. To see fixation process, click here or here.
Aspration
After fixation, we have to out air in plant tissue to avoid penetration of FAA solution blocked. We can use this tools and the process is like this.
Dehydration
This step purposes is to out water in plant tissue so that tissue can exposed with paraffin. We usually do this process with alcohol-xylene solution or alcohol TBA solution. See each step of dehydration here.
Clearing
Clearing purposes is to make sample colorless. See clearing step here.
Infiltration
Infiltration is process to make paraffin can expose on the plant tissue. Infiltration process here.
Embedding
On this step, we need container to make paraffin box or cubicle. Cubicle paraffin is used as place of plant tissue. Embedding process showed here
Paraffin slicing
See the process here.
Patching
We need totally clean of object glass to avoid loosing the slide. wipe up the object glass with dry and clen wiper. For patching agent, we can use Haupt’s solution. see the process here.
coloring
To simplify this step, we can make coloring schedule. The simplest coloring method is progressive method when intensity of color in tissue is straight equivalent with time to submerged in coloring agent. For chart sample, here
Covering with glass cover

Read more...

Using Microscope


On the picture above
  1. Pick up microscope with both hands. One in the base, another in the arm.
  2. Rotate revolver until ‘click’ sound, so the objective with weakest magnification placed on the middle of objective stage (picture a). Set the mirror below until sunlight reflect into ocular (picture b).
  3. Put object glass right on middle of object stage. Set until the gap between object glass and stage get close or almost contact (± 0.5 cm).
  4. hile seeing the ocular, rotate the coarse adjustment knob to set the focus until object appear. Rotate the fine adjustment knob until object seen clearly. Shift the object if necessary.
  5. Use bigger magnification if necessary. Rotate the revolver to change lens.

Note: for strong magnification (1000x) use immersion oil. Pick up the object glass and drop the immersion oil on the object. Put dawn again the object glass on microscope and rotate the adjustment knob until objective lens contact with immersion oil. Vision seen in microscope is opposite current with the object. If the object glass shifted to left, the vision will shifted to right, just the opposite If the object glass shifted to right, the vision will shifted to left.

    Read more...

    After service cares

    We know if every laboratory tools are not cheap. So we have responsibility to keep the good condition of each tool. It means we need to maintenance periodically to keep tools in ready to use condition. So we can invest in other sector beside just buy laboratory tools.

    Microscope is not a cheap laboratory tools. So we need to care the condition. As I told in previous article about: why we need to service our microscope?

    After serviced, microscope will be back in good and ready to use condition even mechanic, optic or electricity. But we can repair the lens if the lens scratched, blurred, corroded or called coated lens. We cannot renormalize because the lens has physical damage. There are no cleaning solutions can remove the damage.

    Minimum after service cares:

    After service condition:

    1. Lenses system clear from fungus.

    2. Mechanical system in good condition (tube not loose)

    3. Microscope covered with plastic like this to minimalist dust reach the lens system.

    4. We recommend more if microscope kept in specific cabinet like this to avoid fungus growth in lenses. Or if you has not the cabinet, you can use microscope box completed with silica gel.

    5. You can add coding and using list to your microscope. Coding contain microscope identity. You also can make user short list which contain use name, like this

    To keep microscope performance, we need comprehensive cares at before, in use, and after use microscope.

    A. Before use microscope :

    1. Pick up microscope with both hands. Pick the microscope arm with right hand and hold the bottom of microscope with left hand like this.

    2. Don’t forget to fill the user list.

    B. When using microscope :

    1. Put microscope on the table has plate and stable surface. Keep away from washbasin and fire.

    2. Check actual condition of microscope.

    3. Set microscope position comfort fit with user.

    4. Put object preparation on object stage. Clip the preparation object with object holder. Make sure the preparation part that you will observe right at the middle of light hole.

    5. Set microscope lightsource (from mirror for light microscope or electric lamp for electric light microscope).

    6. Before observing object with microscope, make sure you know exactly where you rotate fine and coarse adjustment knobs.

    7. Coarse adjustment knob rotated until you look the object. Fine adjustment knob use to make clear object vision more.

    8. Set until you find best vision. You can change light intensity or set the condenser.

    9. For using lens with magnification 1000x, use immersion oil. This lens is always exposed with immersion oil but not touch the specimen surface.

    After use

    1. Clean up and wipe non optical parts of microscope with tissue or dry soft fiberless fabric.

    2. Clean immersion oil on objective lens with xylene.

    3. Clean carefully lens with immersion oil. Never touch the cement around lens. It can solve the cement then make lens loose. Avoid scratch every time you wipe the lens.

    4. Before store the microscope, set the microscope into the begin condition. Turn up the lamp carefully.

    5. Keep the microscope on the cabinet. Avoid dust exposure.

    If you follow instruction above, microscope may be maintained in ready to use condition.

    Leave your comment below this article for improve this article. Thanks.

    Read more...

    Care of The Instrument (Microscope)

    Laboratory instrument such as microscope need certain care. Microscope represent considerable investment and can be damaged rather easily if certain precautions are not observed. The following suggestions cover most hazards:

    1. Microscope has to placed in chill, dry, dustless, and free of acid vapor area. Apropriat place that usually used is a wood box completed with hygroscopic substance such as silica gel. In addition, we can put microscope in case completed with lamp to avoid fungus growth or like this picture

    2. Non-optical parts made from metal or plastic can be cleaned with flannel. to clean dust we can use small painting brush or camera lens brush

    3. Lenses wiped with lens tissue added alcohol 70%. Never wipe lenses with handkerchief or fabric wiper.

    4. Immersion oil at objective lens can wipe off with xylene.

    5. At the end of each lab session, be sure to wipe any immersion oil off the objective lens if it has been used with xylene. When wipe the lens with xylene, wipe carefully never let xylene wipe to non-optical parts to avoid plastic damaged. Never wipe other lenses (ocular) with xylene without factory recommendation.

    Any oil and smooth particles can hazy the lens and make lens scratch.

    6. Before placing microscope, set the object stage away from objective lens. Turn off microscope lamp.

    With following instructions above, microscope can used longer.


    Read more...

      © Blogger template The Professional Template II by Ourblogtemplates.com 2009

    Back to TOP  

    Search Engine Submission - AddMe